


Geekworm KVM-A3 Kit for Raspberry Pi 4 Open Source KVM Over IP Compatible with KVM V3 Platform Only (Unassembled and Not Include Raspberry Pi 4/SD Card/Power Adapter)
Details
- BrandGeekworm
- Model NameKVM-A3
- CPU ModelARMv7
- Connectivity TechnologyEthernet HDMI
- Included Components1 x Ethernet 1

Description
🖥️ Unlock your PC’s potential—control it anywhere, anytime!
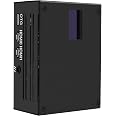
- COMPACT ROBUST - Sleek metal case with all essential accessories, designed for serious Raspberry Pi 4 users.
- PRO GRADE COOLING - Built-in fan keeps your Raspberry Pi 4 cool under heavy remote workloads.
- PLUG PLAY EXPANSION - Includes X630-A3 expansion board & HDMI to CSI-2 adapter for smooth Raspberry Pi 4 integration.
- OPEN SOURCE FLEXIBILITY - Customize and extend with open source software—perfect for tech-savvy pros.
- SEAMLESS REMOTE CONTROL - Manage your PC anytime via browser—power on/off, reboot, BIOS tweaks included.
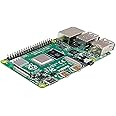
The Geekworm KVM-A3 Kit transforms your Raspberry Pi 4 into a powerful KVM over IP device, enabling full remote control of your computer via any web browser. Designed exclusively for Raspberry Pi 4 models, this unassembled kit includes a metal case, expansion boards, HDMI to CSI-2 module, Ethernet cable, and an OLED display, plus an active cooling fan to ensure optimal performance. Ideal for professional users seeking flexible, open source remote management solutions.


Specifications
| Processor | ARMv7 |
| RAM | LPDDR4 |
| Wireless Type | 802.11b |
| Brand | Geekworm |
| Series | KVM-A3 |
| Item model number | TB-2022-51 |
| Operating System | Not Obtainable |
| Item Weight | 11.3 ounces |
| Product Dimensions | 3.62 x 2.56 x 1.65 inches |
| Item Dimensions LxWxH | 3.62 x 2.56 x 1.65 inches |
| Color | black |
| Processor Brand | Broadcom |
| Number of Processors | 1 |
| Manufacturer | Geekworm |
| ASIN | B0B5R37TT3 |
| Country of Origin | China |
| Date First Available | July 4, 2022 |
Have a Question? See What Others Asked
Reviews
S**T
Great Solution for PiKVM
If you already have a Pi around, this is a fantastic way to convert into PiKVM. It is certainly the cheapest. If you don't already have a Pi, it's still cheaper than getting the PiKVM v4 Plus, which is more aligned with what this offers vs the v4 Mini. The v4 Mini does not support multiport but this does when used with a Pi4, so you can purchase the Ezcoo KVM switch to control more than just one device.A few tips:- Install the heatsinks first (they leave this out of the instructions)- Make sure to flash the image in their Wiki article. I used the DIY v2 image as I was following along with the PiKVM site instead of the Geekworm instructions. The OLED display didn't work and that's when I found their Wiki and saw they recommended a different image (the preassembled Hat V3 or whatever).- Test the whole setup before installing the case. I disassembled the case multiple times - once because I forgot the heatsink, and a second time to get the SD card out... Although there is a cutout of the case to access the card, it is damn near impossible to get it out as it's just too inset and my Pi4 doesn't have an 'eject' mechanism on the card port.- If you're not getting any display output once setup, try toggling the 'video mode' under the system options in the PiKVM web GUI. Nothing shows under H.265/WebRTC for me.I picked this up for $73 on prime day and couldn't be happier considering I already had a Pi4 and the pre-built V4 Plus / Mini are very expensive preassembled. Finally have IP KVM access to my ESXi hosts!
S**Y
Great little network KVM!
Ok, let me start by saying this thing rocks! It's a great little KVM for those that want network access to their computer from afar.....or under the stairs in my mini server setup. It's also nice that its open source. The screen is nice, lets you know its up and running, what IP its assigned, etc.I've been using it several months now and I'm very pleased with it.
R**S
Great Device - but not for Novice
Great device. Worked out of the box.My only complaint is that the instructions do not provide how to apply the included heat sinks to the RPI 4.Put the unit together (not for a novice). Downloaded the software from the web site. Used Etcher to copy image to SD. Love the screen. Used instructions to utilize WiFi. Unit worked immediately. Great feature is the ATX CNTRL pass through.
G**S
KVM over IP on the cheap!
Ordered the product to manage a proxmox homelab running a workstation board that does not have remote management. Kit was easy to assemble, instruction video showed the process perfectly. Flashed pikvm to a sd card and booted it, worked perfectly first time. LCD showed the ip it had been assigned and i was logged in to remote pc in a few clicks. I wouldn't try to use it for remote gaming, programs like parsec work much better, there is a bit of lag. Using it to manage a remote pc for non gaming tasks, it works perfectly, ability to access bios/UEFI and remotely power and reset makes this a very affordable alternative to other products on the market. It does have a few quirks, the best performance comes from using 720p resolution, though 1080p works quite well too, just don't expect 60 fps. It's locked to 50hz refresh rate, and may need a bit of tweaking for some users. Wiki has much info and the KVM can easily be managed using the terminal or third party software such as putty.
M**H
Great Kit - Works Flawlessly with PiKVM
I bought this as I needed remote KVM/IPMI access in an area that I can only get WiFi, and this kit plus PiKVM was a the perfect solution. This was my first foray into PiKVM so I can't it compare to other kits or PiKVM's own product, but this kit had a very easy setup and did everything I wanted. All you need is an RPI4B, this kit (with power supply), a microSD card, and an HDMI cable.Follow the instructions that come with the kit to assemble, then follow the instructions on the Geekworm website to image it with PiKVM, then go to the PiKVM website to finish configuring.If you expect to do some tweaking/experimentation and think you may need to re-image more than once, I suggest you don't close up the chassis. Although there's a slot to take the SD card out through the case it's too narrow to use, so better to leave the case open until you're 100% set up in case you need to remove the card, rather than removing all the screws every time.Once setup and imaged, all the features worked out of the box, including the OLED. It only takes a handful of commands in PiKVM to get it fully functional for immediate use, though there's plenty of tweaking you can do beyond the basics. If you need WiFi I suggest running wifi-menu (the built-in Arch linux wifi setup tool) instead of the instructions on the PiKVM website.You will likely get a repeating error message about low voltage when you first boot PiKVM with this kit attached. This is normal per the PiKVM website and should go away after a few hours of being powered on and building up a charge. It doesn't impact anything beyond being annoying and filling up your screen before you have full monitor resolution. CR1220 battery is not needed but should get rid of it as well.Great product, will probably buy several more in the future.
Common Questions
Trustpilot
1 day ago
2 days ago
